
Guide
How to Add and Publish Guides
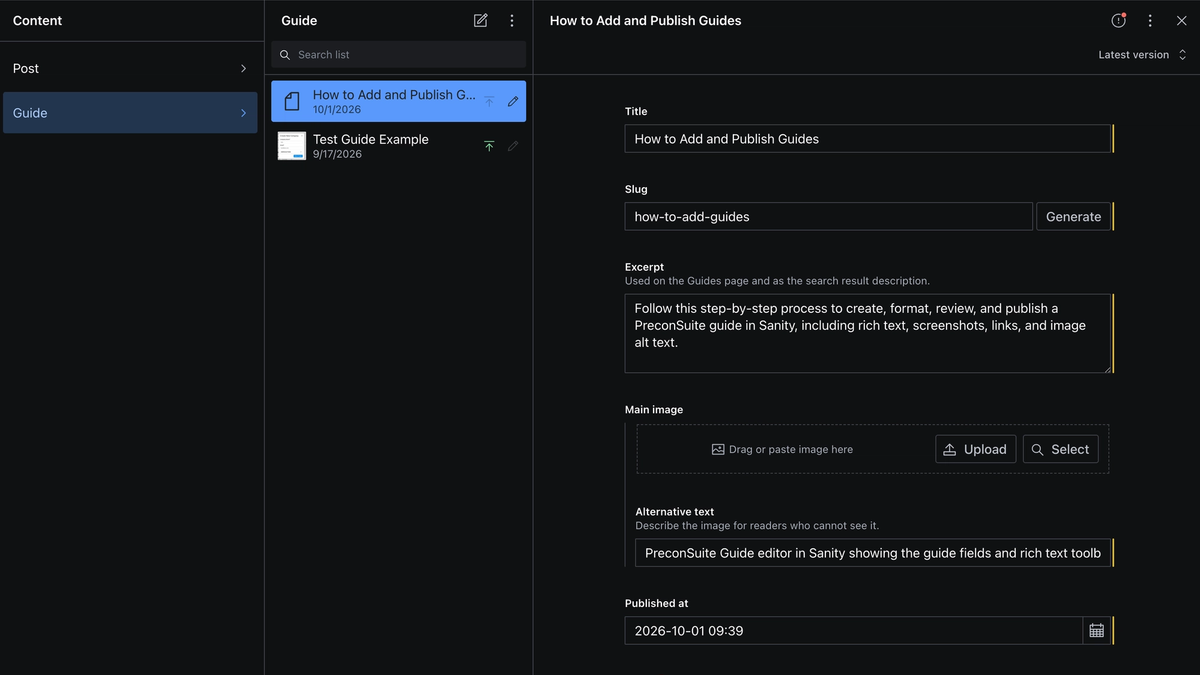
Follow this step-by-step process to create, format, review, and publish a PreconSuite guide in Sanity, including rich text, screenshots, links, and image alt text.
This guide explains how to create, format, review, and publish a guide on the PreconSuite website. It is intended for anyone preparing educational, marketing, or product content.
Before starting, collect the final copy, links, and images you expect to use. Having these ready makes it easier to build and review the guide in one pass.
1. Open the Guide editor
Open the [PreconSuite admin portal](https://preconsuite-admin.vercel.app/) and sign in with your authorized account.
In the Structure area:
- Select Guide.
- Select the create or plus button to make a new Guide.
- To update an existing guide, select its title from the Guide list instead.
Sanity saves your work as a draft while you edit. A draft is not visible on the website until it has been published.
IMAGE: Guide list and create button
Suggested caption: Select Guide, then use the create button to begin a new guide.
Suggested alternative text: Sanity Studio Guide list with the create button highlighted.
2. Complete the guide fields
Title
Enter a clear, specific title that tells readers what they will learn or accomplish.
Good titles usually:
- Begin with the reader’s task or desired result.
- Use familiar language.
- Stay concise enough to scan on the Guides page.
- Avoid adding “PreconSuite” unless it helps explain the subject.
Do not manually add “| PreconSuite.” The website adds the brand name to the browser and search title.
Slug
The slug becomes the final part of the guide’s web address.
After entering the title, use Generate in the Slug field. The result should contain lowercase words separated by hyphens, such as:
how-to-manage-bid-invitations
Review the slug before publishing. Changing it later changes the guide’s URL and can break existing links.
Excerpt
Write one or two short sentences explaining who the guide is for and what readers will learn.
The excerpt appears:
- On the Guides page.
- Near the top of the guide.
- In search-engine descriptions.
- In social-sharing information.
The field allows a maximum of 240 characters. Aim for approximately 140–180 characters, use plain text, and put the most important benefit first.
Main image
A main image is optional, but it is strongly recommended. It appears on the guide, its card on the Guides page, and in social-sharing previews.
Use a high-quality landscape image. A 16:9 image of at least 1200 × 675 pixels works well. Keep the important subject near the center because the website crops the image differently in cards and social previews.
After uploading the image:
- Use the hotspot or crop controls to preserve the important area.
- Complete the required Alternative text field.
- Describe what is visible and useful, not the filename.
- Do not begin alternative text with “Image of” or “Screenshot of.”
Good alternative text: “Bid calendar showing three projects organized by due date.”
Poor alternative text: “calendar-final-v2.png”
Published at
Sanity fills this field with the current date and time. That date is displayed on the guide and determines its position on the Guides page.
Keep the current value when the guide should become visible immediately after publishing. A future date keeps the guide off the website until that time, even if the Sanity document has been published.
IMAGE: Completed guide fields
Suggested caption: Complete the title, slug, excerpt, main image, publication date, and Body before publishing.
Suggested alternative text: Sanity Guide editor showing completed title, slug, excerpt, main image, and publication date fields.
3. Write and format the Body
The Body field is Sanity’s rich text editor. Click inside it to begin typing or paste prepared copy.
Paragraph and heading styles
Use the style menu in the editor toolbar to format the entire paragraph containing the cursor:
- Normal: Standard paragraphs and instructions.
- H2: Main sections of the guide.
- H3: Subsections within an H2 section.
- H4: Small subsections used only when necessary.
- Quote: Important callouts or short quotations.
- H1: Available in the editor, but do not use it in the Body. The guide title is already the page’s H1.
Use headings in order. Start with H2, place H3 sections beneath an H2, and use H4 only beneath an H3.
Bold and italics
Select text and use:
- Strong for important interface labels, buttons, or short warnings.
- Emphasis for occasional emphasis.
Avoid formatting entire paragraphs in bold or italics. Too much emphasis makes the page harder to scan.
Bullet lists
Use the Bullet toolbar control for short lists, requirements, or checks.
The current editor supports bullet lists but does not provide a numbered-list style. For step-by-step procedures, use headings such as “1. Open the editor” and “2. Complete the fields.”
Links
To add a link:
- Select meaningful link text.
- Choose the URL control in the toolbar.
- Enter the complete destination URL.
- Confirm the link.
Use descriptive text such as “open the PreconSuite admin portal.” Avoid vague phrases such as “click here.”
Open or test each link before publishing.
Quotes and callouts
Use Quote sparingly for an important warning, recommendation, or takeaway. Quotes appear with a colored vertical line on the published guide.
For example:
> Before publishing, verify the guide on the staging website and download its PDF.
Add an image inside the Body
Place the cursor where the image should appear and use the editor’s insert control to choose Image. Upload a new image or select an existing asset.
For every Body image:
- Complete the required Alternative text.
- Add an optional Caption when readers need extra context.
- Adjust the crop or hotspot if needed.
- Place the image immediately after the instruction it illustrates.
Images can be repositioned in the editor. Double-click an image, or open its edit action, to update its asset, crop, alternative text, or caption.
IMAGE: Rich text toolbar with controls identified
Suggested caption: Use the Body toolbar to apply headings, emphasis, bullets, links, quotes, and images.
Suggested alternative text: Sanity Body editor toolbar showing the style, bold, italic, bullet, link, and image controls.
IMAGE: Body image editor
Suggested caption: Every Body image requires alternative text; captions are optional.
Suggested alternative text: Sanity image editor showing the Alternative text and Caption fields.
4. Create useful screenshots
A screenshot should help the reader complete the nearby instruction. Avoid adding images only for decoration.
When taking screenshots:
- Show one task or interface area at a time.
- Crop unused browser space and unrelated navigation.
- Remove customer names, email addresses, project information, and other sensitive data.
- Use realistic sample content where useful.
- Keep text large enough to read on a laptop or in the downloadable PDF.
- Use consistent browser size and zoom across the guide.
- Add arrows or highlights only when the control would otherwise be difficult to find.
- Place each screenshot directly after the relevant instruction.
For interface screenshots, a width of approximately 1600 pixels usually provides enough detail while allowing the website to resize the image cleanly.
Alternative text should explain what the screenshot communicates. The caption can explain why the image matters or what the reader should do next.
5. Review the guide
Before publishing, check the following:
- The title clearly describes the guide’s outcome.
- The slug is final and contains no spaces.
- The excerpt is 240 characters or fewer.
- The Published at value is correct.
- The introduction identifies the intended reader and result.
- The Body does not contain another H1.
- Headings follow a logical H2, H3, and H4 order.
- Instructions use the same names readers see in the product.
- Links point to the correct pages.
- Every image has useful alternative text.
- Captions add context instead of repeating alternative text.
- Screenshots do not expose sensitive information.
- The guide is easy to scan on desktop and mobile.
- The guide still reads clearly when downloaded as a PDF.
The current guide editor supports paragraphs, H1–H4, quotes, bullet lists, bold, italics, URL links, and images. It does not currently support tables, numbered-list formatting, embedded videos, buttons, or code blocks.
6. Publish and verify
When the guide is ready, select Publish in Sanity. Resolve any validation messages if the Publish action is unavailable.
After publishing:
- Open the staging website’s Guides page.
- Confirm that the new card appears.
- Open the guide and review the title, excerpt, date, main image, headings, links, and Body images.
- Check the page at both desktop and mobile widths.
- Select Download PDF and review the exported guide.
- Correct any issues in Sanity and select Publish again.
> If a published guide does not appear, first confirm that Published at is set to the current time or an earlier time. A future Published at value intentionally keeps the guide hidden.
Publishing later edits requires selecting Publish again. Always repeat the website and PDF checks after making substantial changes.